Authenticate Requests
OAuth
Delivery Hub's API uses the OAuth 2.0 Client Credentials Grant Flow to authorize communications between your external systems and Delivery Hub. It keeps your data secure and ensures no outside party can send malicious payloads to your Delivery Hub account.
OAuth works by generating a secret key that you then use to request a token. When you add this token to the header of your API payloads, Delivery Hub authorizes the sender to act on your behalf. You can think of this as adding a new user who signs in with a username and password (token) and has limited permissions.
The actions that APIs can take are limited by scopes, which determine the API endpoints each token can access. Learn more.
Create an OAuth client app to generate a secret key
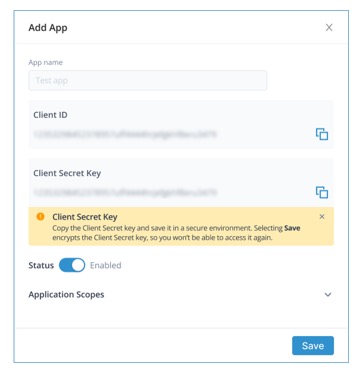
Delivery Hub generates a unique Client ID and Client Secret Key for each app that you create in the settings.
The Client ID is the public identifier for the app and does not change, even when you regenerate the key. You can think of this as the app username.
The Client Secret Key is hidden from all users after you close the window, so be sure to copy it to add to the token request. You can think of this as the app password and the ID and token that replaces it in your other payloads as a password manager.
When you generate a new Secret Key, the previous key is disabled along with the token linked to it. Payloads using a disabled key are not authorized by Delivery Hub, and return an error.
We recommend creating a separate app and corresponding token for each integration that you add. That way, if one of your apps is compromised, the rest of your integrations remain safe.
For example, you can create one app for your Order Management System (OMS), another for your Warehouse Management System (WMS), and another for billing.
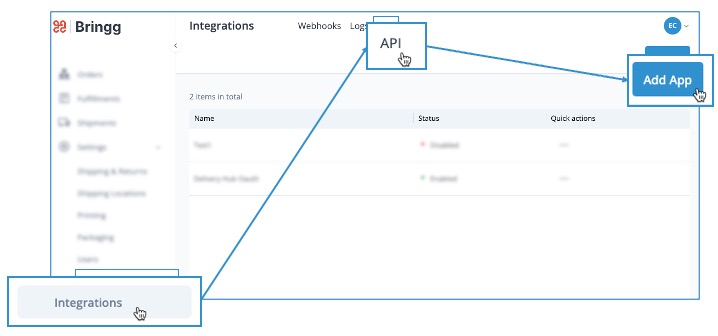
- Open Delivery Hub and go to Settings > Integrations, and select the API tab. Then, select Add App.
- Enter an easily recognizable name for the app in the App name field. For example, if you are creating this app to connect with your OMS, include the name of your OMS in the title.
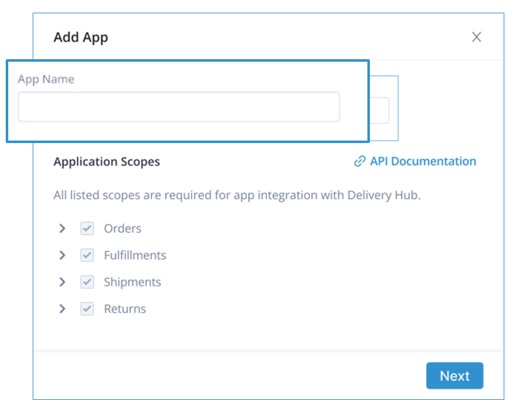
- Note the list of scopes to understand the data that Delivery Hub APIs can access.
All Order, Fulfillment, Shipment, and Return scopes are required for Delivery Hub APIs, including all scopes added to these groups in the future.
- Select Save to generate the Client ID and Client Secret Key.
- Copy the Client Secret Key so you don't lose access to it when you close the window.
Request an access token
Once you have generated the Client ID and Client Secret Key, send a request for a token to Bringg's authentication endpoint. You can send this payload using Postman [Authentication](ref:authentication# Request-a-token-using-Postman) or any other API testing client.
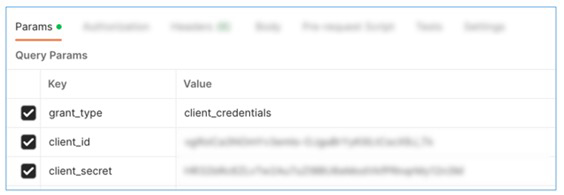
- Add the app credentials (ID and Secret) that you just received to the call header.
The URL for this call is https://eu2-admin-api.bringg.com/oauth/token or https://us2-admin-api.bringg.com/oauth/token, depending on the environment where your account is located. - Add the parameters to the request body, then send the call.
    curl --location --request POST 'https://admin-api.bringg.com/oauth/token' \
    -F 'grant_type=client_credentials' \
    -F 'client_id=kTKda4xsXRyFf9iZEK4skK.....3F0iZBl9WBQ_hV9Yk' \
    -F 'client_secret=yyTPn3TzJkfUkwQv.....VY-Xa22WTSUXxCiwWWENE' \
-F 'ttl=<optional TTL in seconds>'| Parameter | Description |
|---|---|
| grant_type | This type of request is for the client_credentials grant type. |
| client_id | Your client ID |
| client_secret | Your Client Secret Key |
| ttl | (Optional) Time-To-Live, or the amount of time that this token is valid. The default TTL is 30 minutes for write-oriented APIs (POST, PUT, PATCH, DELETE) and 4 hours for read-oriented APIs (GET). You can delete this line if you do not want to deviate from the default duration. |
- Bringg responds to a successful call with an access token:
    {
        "access_token": "eyJ0eXAiOiJKV1QiLCJhbGciOiJIUzUxMiJ9.XXXXX.Pt6x7aUIA5afPGCgFJot0C8VVGihxDHxi3kFniXd2qvOuCQWpEVt2_X2s4Pww1zj1YK3ERQeg...",
        "token_type": "Bearer",
        "expires_in": 3600,
        "created_at": 1583192109
}| access_token | This is the access token that should be attached to all API calls. |
| token_type |
|
| expires_in | This is the duration, in seconds, when the access_token is valid. For comparison, one hour has 3,600 seconds. |
| created_at | This is a Unix timestamp of the date and time when the token was created. You can use a converter to translate this number into a readable timestamp. |
Request a token using Postman
- Open a new request by selecting File > New > HTTP Request or select the + icon in the tab bar.

- Enter the URL for this call.
Use https://eu2-admin-api.bringg.com/oauth/token for accounts using servers located in Europe, and https://us2-admin-api.bringg.com/oauth/token for accounts using servers in the US.

- Change the call type from Get to Post.
- Enter the parameters of the authorization request under the Params tab. Postman automatically formats the request to communicate with the server.
Add your token to your payloads
Pass this token to the header of your API requests. Using the header from the example below, replace the parentheses and their contents with the token.
{ curl --location --request POST 'https://api.bringg.com/v2/orders
-- header 'Authorization: Bearer (token)'
Request a new token
For continued access to the Bringg API endpoints, refresh your token before it expires (expires_at).
Repeat the steps above to receive a fresh token, then add it to your headers. You can automate this process by scheduling runs with Postman.
There is no need to generate a new key when refreshing your token.
Updated about 1 year ago