Webhook Authentication Methods
To ensure that your other systems recognize and accept webhooks from Bringg, you may need to include authentication data in your webhooks. To do this, add authentication methods in Bringg, then select the relevant authentication method when registering for individual webhooks.
Bringg supports the following authentication methods for webhooks:
| Field | Description |
|---|---|
| JSON Web Token (JWT) | This method consists of three parts: a header, a payload, and a signature. The header contains information about the type of token and the algorithm used for the signature. The payload contains the claims or information about the user or entity being authenticated. The signature is created by hashing the header and payload with a secret key to ensure the integrity of the token. |
| OAuth 2.0 | OAuth 2.0 provides multiple layers of security, requiring Bringg to access a token to include in your webhooks. To use OAuth 2.0, create an app in the receiving system to generate a Client ID and a Client secret for Bringg to use when requesting an authentication token. You can determine if OAuth 2.0 data is included in webhooks as a form, JSON, or query strings. |
| Static Headers | Include an authorization token or API key in the header of the HTTP request. |
Authentication Examples
 {
    "auth": {
      "type": "oauthBasic"
      "clientId": "your_ID",
      "clientSecret": "your_client_secret",
      "baseUrl": "your_URL",
      "path": "/oauth/token",
      "scope": "write:orders",
      "grant_type": "client_credentials"
      "authRequestType":"form"
    }
 }
        "authenticator": {
            "bearer_name": "JWTBearer",
            "name": "jwt",
            "signature_header": "Authorization",
            "jwtConfig": {
                "header": {
                    "alg": "HS256"
                },
                "payload": {
                    "sub": "bringg-event",
                    "aud": "your-audience",
                    "iss": "https://us2-admin-api.bringg.com",
                    "exp": 20160,
                    "iat": 0
                },
                "signature": {
                    "key": "yourkey",
                    "type": "base64"
                }
            }
        }
"headers": {
  "Authorization": "Bearer xxxxxxxxxxxx",
  "application-key": "xxxxxxxxxxxxxx"
}
Before You Begin
- Confirm you have the Admin user type in Bringg.
- Determine the requirements of the systems that are listening for webhooks from Bringg.
Configure JWT or OAuth 2.0
- In Bringg, select your username from the sidebar, then select Settings > Platform Integrations > Authentication Methods.
- Select Add Authentication Method.
- Under Use for, select Webhooks.
- Enter a Display name for the authentication method that you and other members of your team will recognize. For example, you can enter the authentication type.
- Select the relevant authentication type ( JWT or OAuth 2.0).
- Enter the relevant details for the selected method:
OAuth 2.0
| Field | Description |
|---|---|
| Client ID | This is the public identifier for your OAuth app and does not change, even when you regenerate the key. You can think of this as the app username. |
| Client secret | This is the key that Bringg uses to request an authentication token. You can think of this as the app password. |
| Authorization URL | This is where Bringg sends the token request, including your Client ID and Client secret key. |
| Path | (Optional) A URL path includes a forward slash / and content following it. For example, in the URL for this article, the path is /docs/webhook-authentication-methods-copy. |
| Request type | This determines how Bringg includes your OAuth data in webhooks: - Form: included as form data in the body of the webhook HTTP request. The header Content-Type: application/x-www-form-urlencoded) instructs your listening system to parse the included form.- JSON: included in the body of the HTTP request using JSON formatting. - Query strings (qs): included in the HTTP request URL. This is generally considered less secure than the other options. |
| Scope | (Optional) Scopes determine which data in the receiving system Bringg's webhooks can change. The structure of scopes varies and depends on the structure of your listening system, but they are typically formatted as access level: resource. For example, read:orders.Select None to send an empty set of scopes, or select Enter your own to add the required scopes for this webhook. |
| Resource | (Optional) This is the resource that the authentication method is requesting access to. |
| Headers | (Optional) Add static headers to be included in all webhooks using this authentication method. Static heads are made up of key-value pairs. |
JWT
| Field | Description |
|---|---|
| Signature key | This is the key provided by your receiving system and appears below the webhook payload as part of the signature object. |
| Token expiration | This indicates how long the token can be used before it expires, in minutes. |
| Issuer (iss) | This is the identity of the entity sending the webhook (Bringg). |
| Algorithm | This is the algorithm used to encrypt the signature key. |
| Audience (aud) | This specifies the audience for your webhook. This is one way that your systems filter the payloads they receive. |
| Subject (sub) | This is a unique identifier that is recognized by the recipient system. This could be an email or a tag like bringg-event. |
| Encoding | (Optional) When base64 encoding is enabled, the header and payload are converted into ASCII string format, making it possible to send where text-based communication is required or preferred. |
| Not before (nbf) | (Optional) This determines when the token becomes valid. It cannot be used "before" the specified time. This should be formatted in Unix epoch time. |
| Token Type | This lets your listening system know the structure and format of the access token. |
- Select Save to finalize your authentication method.
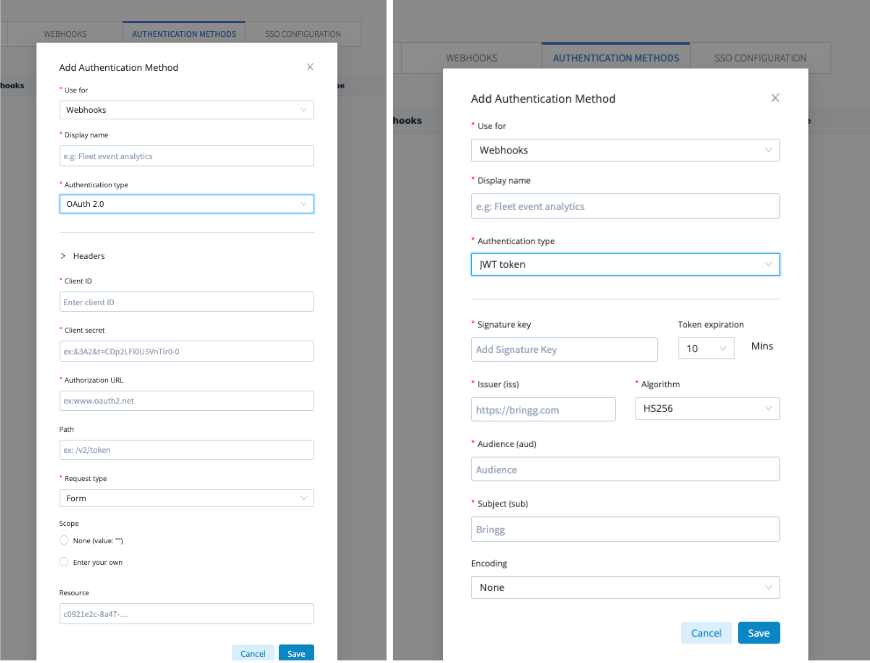
Images of adding OAuth 2.0 (left) and JWT (right) Authentication Methods
Configure static headers
You can configure static headers when subscribing to individual webhooks.
Edit or Delete an Authentication Method
- To update or remove an authentication method, open Bringg and navigate to Settings > Platform Integrations > Authentication Methods.
- Select the action menu next to the relevant method, then select Edit or Delete.
Caution
Depending on the configuration of your external systems, editing or deleting an authentication method can cause your webhooks to fail. Be sure to test your webhooks after making changes.
Subscribe to Webhooks
Once you create authentication methods, you can select the appropriate one for each webhook. Learn more about subscribing to webhooks.
Updated about 2 months ago